How to connect to internet using Nokia 6120 classic as a modem
see also: How To Use OpenDNS
1 .Internet Service Provider (TELKOMSEL) Specific Settings
2. Internet Connection Using wvdial Via USB Data Cable
3. Internet Connection Using wvdial Via Bluetooth
4. Internet Connection Using NetworkManager Via USB Data Cable
1 .Internet Service Provider (TELKOMSEL) Specific Settings
Modem : Nokia 6120
Internet Provider : telkomsel
Dial up Program : wvdial and NetworkManager (via nm-applet)
Internet Service Provider (telkomsel) specific setting:
—[unlimited package or volume based setting]—
Dialer No = *99#
APN = internet
Username = <blank>
Password = <blank>
———- or ————
Dialer No = *99#
APN = telkomsel
Username = wap
Password = wap123
If you are a subscriber to unlimited package service then the setting as mentioned above.
The setting above also applies as volume based setting if you are a non-subscriber to unlimited package service.
—[Time base setting]—
Dialer No = *99#
APN = flash
Username = <blank>
Password = <blank>
2. Internet Connection Using wvdial Via USB Data Cable
STEP 0:
a. Make sure that you are already able to surf with your handset (Nokia 6120 classic) first.
b. Make sure below settings for Nokia 6120 class
Nokia 6120 classic Menu->Settings->Phone Setting->Connection->USB->USB mode = PC Suite
Nokia 6120 classic Menu->Settings->Phone Settings->Connection->Packet data->Access point=NAME_OF_APN_OF_INTERNET_PROVIDER (in this case, we will use internet)
c. plug the Nokia 6120 classic USB cable into your laptop/PC USB port
STEP 1:
As root, create /etc/wvdial.conf file using wvdialconf command
[yunusf10@localhost etc]$ su -c ‘wvdialconf’
Password:
Editing `/etc/wvdial.conf’.
Scanning your serial ports for a modem.
ttyS0<*1>: ATQ0 V1 E1 — failed with 2400 baud, next try: 9600 baud
ttyS0<*1>: ATQ0 V1 E1 — failed with 9600 baud, next try: 115200 baud
ttyS0<*1>: ATQ0 V1 E1 — and failed too at 115200, giving up.
Modem Port Scan<*1>: S1 S2 S3
WvModem<*1>: Cannot get information for serial port.
ttyACM0<*1>: ATQ0 V1 E1 — OK
ttyACM0<*1>: ATQ0 V1 E1 Z — OK
ttyACM0<*1>: ATQ0 V1 E1 S0=0 — OK
ttyACM0<*1>: ATQ0 V1 E1 S0=0 &C1 — OK
ttyACM0<*1>: ATQ0 V1 E1 S0=0 &C1 &D2 — OK
ttyACM0<*1>: ATQ0 V1 E1 S0=0 &C1 &D2 +FCLASS=0 — OK
ttyACM0<*1>: Modem Identifier: ATI — Nokia
ttyACM0<*1>: Speed 4800: AT — OK
ttyACM0<*1>: Speed 9600: AT — OK
ttyACM0<*1>: Speed 19200: AT — OK
ttyACM0<*1>: Speed 38400: AT — OK
ttyACM0<*1>: Speed 57600: AT — OK
ttyACM0<*1>: Speed 115200: AT — OK
ttyACM0<*1>: Speed 230400: AT — OK
ttyACM0<*1>: Speed 460800: AT — OK
ttyACM0<*1>: Max speed is 460800; that should be safe.
ttyACM0<*1>: ATQ0 V1 E1 S0=0 &C1 &D2 +FCLASS=0 — OK
Found an USB modem on /dev/ttyACM0.
/etc/wvdial.conf<Warn>: Can’t open ‘/etc/wvdial.conf’ for reading: No such file or directory
/etc/wvdial.conf<Warn>: …starting with blank configuration.
Modem configuration written to /etc/wvdial.conf.
ttyACM0<Info>: Speed 460800; init “ATQ0 V1 E1 S0=0 &C1 &D2 +FCLASS=0”
[yunusf10@localhost etc]$
STEP 2:
The contents of /etc/wvdial.conf file created by wvdialconf command may look like as follows
[Dialer Defaults]
Init2 = ATQ0 V1 E1 S0=0 &C1 &D2 +FCLASS=0
Modem Type = USB Modem
; Phone = <Target Phone Number>
ISDN = 0
; Username = <Your Login Name>
Init1 = ATZ
; Password = <Your Password>
Modem = /dev/ttyACM0
Baud = 460800
STEP 3:
As root, edit /etc/wvdial.conf using your favourite text editor ( I use vi) so that the contents of /etc/wvdial.conf will look like as follows:
[yunusf10@localhost bluetooth]$ su -c ‘vi /etc/wvdial.conf’
;———-begin /etc/wvdial.conf————-
[Dialer Defaults]
Init1 = ATZ
Init2 = ATQ0 V1 E1 S0=0 &C1 &D2 +FCLASS=0
Init3 = AT+CGDCONT=1,”IP”,”internet”
Username =”
Password = ”
Phone = *99#
Modem Type = USB Modem
ISDN = 0
Modem = /dev/ttyACM0
Baud = 460800
;———end /etc/wvdial.conf——————
Note that both Username and Password use two *single quote* characters.
STEP 4:
As root, execute wvdial command to make internet connection
[yunusf10@localhost etc]$ su -c ‘wvdial’
Password:
–> WvDial: Internet dialer version 1.60
–> Cannot get information for serial port.
–> Initializing modem.
–> Sending: ATZ
ATZ
OK
–> Sending: ATQ0 V1 E1 S0=0 &C1 &D2 +FCLASS=0
ATQ0 V1 E1 S0=0 &C1 &D2 +FCLASS=0
OK
–> Sending: AT+CGDCONT=1,”IP”,”internet”
AT+CGDCONT=1,”IP”,”internet”
OK
–> Modem initialized.
–> Sending: ATDT*99#
–> Waiting for carrier.
ATDT*99#
CONNECT
~[7f]}#@!}!} } }2}#}$@#}!}$}%\}”}&} }*} } g}%~
–> Carrier detected. Waiting for prompt.
~[7f]}#@!}!} } }2}#}$@#}!}$}%\}”}&} }*} } g}%~
–> PPP negotiation detected.
–> Starting pppd at Sun Mar 29 00:11:25 2009
–> Pid of pppd: 6824
–> Using interface ppp0
–> local IP address 114.121.57.229
–> remote IP address 10.6.6.6
–> primary DNS address 202.3.208.11
–> secondary DNS address 202.3.210.11
STEP 5:
As root, add values of values of primary DNS and secondary DNS address into /etc/resolv.conf file based on information obtained from STEP 4. The contents of the /etc/resolv.conf file may look like as follows:
—–begin /etc/resolv.conf——
nameserver 202.3.208.10
nameserver 202.3.210.10
—–end /etc/resolv.conf——-
STEP 6:
Now the internet connection is ready to be used. Press CTRL+C to disconnect the internet connection.
STEP 7:
To make internet connection, repeat STEP 4 (and STEP 5).
To disconnect, press CTRL+C.
Note that NetworkManager will erase the DNS address(es) you store in /etc/resolv.conf. So, you may need to repeat STEP 5 to make internet connection.
For more information please see the manual for wvdial.conf and wvdialconf :
[yunusf10@localhost etc]$ man wvdialconf
[yunusf10@localhost etc]$ man wvdial.conf
3. Internet Connection Using wvdial Via Bluetooth
STEP 0 :
Make sure that you are able to browse the internet with your handset (Nokia 6120 classic) first.
STEP 1 :
Make sure below setting has been configured for Nokia 6120 classic.
Nokia 6120 classic Menu->Settings->Phone Settings->Connection->Packet data->Access point=NAME_OF_APN_OF_INTERNET_PROVIDER (in this case, it will be flash)
STEP 2 :
Turn on bluetooth of both Nokia 6120 classic and the laptop/PC.
STEP 3 :
Pair the Nokia 6120 classic with the laptop/PC.
a. Nokia 6120 Classic Menu->Settings->Connectivity->Bluetooth->Paired devices->Options->New paired device->LAPTOP_NAME_or_PC_NAME
b. enter passcode for Nokia 6120 Classic
c. enter passkey for your laptop/PC using the same passcode you entered into Nokia 6120 Classic
STEP 4 :
Inquire remote bluetooth device address (Nokia 6120 classic) and print the device name.
[yunusf10@localhost ~]$ hcitool scan
Scanning …
00:1D:98:B1:F4:28 n6120c.yunix
[yunusf10@localhost ~]$
STEP 5:
Find out the Channel Number used by DUN service (in this case, we found Channel: 4)
[yunusf10@localhost ~]$ sdptool search DUN
Inquiring …
Searching for DUN on 00:1D:98:B1:F4:28 …
Service Name: Dial-Up Networking
Service RecHandle: 0x1004b
Service Class ID List:
“Dialup Networking” (0x1103)
Protocol Descriptor List:
“L2CAP” (0x0100)
“RFCOMM” (0x0003)
Channel: 4
Language Base Attr List:
code_ISO639: 0x454e
encoding: 0x6a
base_offset: 0x100
Profile Descriptor List:
“Dialup Networking” (0x1103)
Version: 0x0100
STEP 6:
Based on information obtained from STEP 4 (Nokia 6120 classic bluetooth device address) and STEP 5 (channel number used by DUN service for Nokia 6120 classic), as root, edit the /etc/bluetooth/rfcomm.conf using your favourite text editor (I use vi) so that the contents of /etc/bluetooth/rfcomm.conf will look like as follows
[yunusf10@localhost ~]$ su -c ‘vi /etc/bluetooth/rfcomm.conf’
#—–begin /etc/bluetooth/rfcomm.conf—————–
rfcomm0 {
# Automatically bind the device at startup
bind yes;
# Bluetooth address of the device
device 00:1D:98:B1:F4:28;
# RFCOMM channel for the connection
channel 4;
# Description of the connection
comment “Bluetooth device:Nokia 6210 Classic as a modem”;
}
#—–end /etc/bluetooth/rfcomm.conf—————–
STEP 7:
a. As root, bind the RFCOMM device to bluetooth device (Nokia 6120 classic) with specified channel number.
In this case, we bind 0 (the RFCOMM device) to 00:1D:98:B1:F4:28 (Nokia 6120 classic bluetooth address) using 4 (channel number).
[yunusf10@localhost bluetooth]$ su -c ‘rfcomm bind 0 00:1D:98:B1:F4:28 4’
Password:
b. Print information about configure RFCOMM devices using rfcomm command
[yunusf10@localhost bluetooth]$ rfcomm
rfcomm0: 00:1D:98:B1:F4:28 channel 4 clean
STEP 8:
As root, edit /etc/wvdial.conf using your favourite text editor so that the contents of /etc/wvdial.conf will look like as follows:
[yunusf10@localhost bluetooth]$ su -c ‘vi /etc/wvdial.conf’
;———-begin of /etc/wvdial.conf————-
[Dialer flash-bluetooth]
Init1 = ATZ
Init2 = ATQ0 V1 E1 S0=0 &C1 &D2 +FCLASS=0
Init3 = AT+CGDCONT=1,”IP”,”flash”
Username =”
Password = ”
Phone = *99#
ISDN = 0
Modem = /dev/rfcomm0
Baud = 460800
;———end /etc/wvdial.conf——————
Note that both Username and Password use two *single quote* characters.
As you can see that the location of the modem device set to Modem=/dev/rfcomm0 (refer to STEP 7). If we use USB data cable, the location may be Modem=/dev/ttyACM0
STEP 9:
Find out the currently active network interfaces.
[yunusf10@localhost ~]$ ifconfig
eth0 Link encap:Ethernet HWaddr 00:1B:24:52:F3:BF
UP BROADCAST MULTICAST MTU:1500 Metric:1
RX packets:0 errors:0 dropped:0 overruns:0 frame:0
TX packets:0 errors:0 dropped:0 overruns:0 carrier:0
collisions:0 txqueuelen:1000
RX bytes:0 (0.0 b) TX bytes:0 (0.0 b)
Interrupt:17
lo Link encap:Local Loopback
inet addr:127.0.0.1 Mask:255.0.0.0
inet6 addr: ::1/128 Scope:Host
UP LOOPBACK RUNNING MTU:16436 Metric:1
RX packets:40 errors:0 dropped:0 overruns:0 frame:0
TX packets:40 errors:0 dropped:0 overruns:0 carrier:0
collisions:0 txqueuelen:0
RX bytes:4123 (4.0 KiB) TX bytes:4123 (4.0 KiB)
STEP 10:
As root, shutdown the driver for currently active network interface(s) to avoid conflict. (DO NOT shutdown the driver for lo interface)
[yunusf10@localhost ~]$ su -c ‘ifdown eth0’
Password:
STEP 11:
As root, make internet connection by executing wvdial command
[yunusf10@localhost ~]$ su -c ‘wvdial flash-bluetooth’
Password:
–> WvDial: Internet dialer version 1.60
–> Cannot get information for serial port.
–> Initializing modem.
–> Sending: ATZ
ATZ
OK
–> Sending: ATQ0 V1 E1 S0=0 &C1 &D2 +FCLASS=0
ATQ0 V1 E1 S0=0 &C1 &D2 +FCLASS=0
OK
–> Sending: AT+CGDCONT=1,”IP”,”flash”
AT+CGDCONT=1,”IP”,”flash”
OK
–> Modem initialized.
–> Sending: ATDT*99#
–> Waiting for carrier.
ATDT*99#
CONNECT
~[7f]}#@!}!} } }2}#}$@#}!}$}%\}”}&} }*} } g}%~
–> Carrier detected. Waiting for prompt.
~[7f]}#@!}!} } }2}#}$@#}!}$}%\}”}&} }*} } g}%~
–> PPP negotiation detected.
–> Starting pppd at Sun Mar 29 15:50:35 2009
–> Pid of pppd: 4598
–> Using interface ppp0
–> local IP address 114.122.127.85
–> remote IP address 10.6.6.6
–> primary DNS address 202.3.208.10
–> secondary DNS address 202.3.210.10
STEP 12:
As root, add values of values of primary DNS and secondary DNS address into /etc/resolv.conf file based on information obtained from STEP 11. The contents of the /etc/resolv.conf file may look like as follows:
—–begin of /etc/resolv.conf——
nameserver 202.3.208.10
nameserver 202.3.210.10
—–end of /etc/resolv.conf——-
STEP 13:
Now the internet connection is ready. press CTRL+C to disconnect the internet connection.
STEP 14:
To make internet connection, repeat STEP 2, STEP 3, STEP 7.b., STEP 11 (and STEP 12).
To disconnect, press CTRL+C.
Note that NetworkManager will erase the DNS address(es) you store in /etc/resolv.conf. So, you may need to repeat STEP 12 to make internet connection.
4 Internet Connection Using NetworkManager Via USB Data Cable
STEP 0:
a. Make sure that you are already able to surf with your handset (Nokia 6120 classic) first.
b. Make sure below settings for Nokia 6120 class
Nokia 6120 classic Menu->Settings->Phone Setting->Connection->USB->USB mode = PC Suite
Nokia 6120 classic Menu->Settings->Phone Settings->Connection->Packet data->Access point=NAME_OF_APN_OF_INTERNET_PROVIDER (in this case, we will use flash)
c. plug the Nokia 6120 classic USB cable into your laptop/PC USB port
STEP 1:
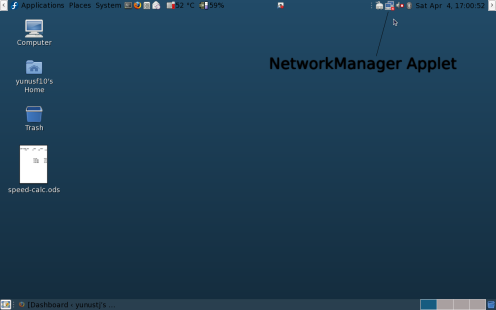
Locate NetworkManager applet on the right side of GNOME panel (or KDE or XFCE or LXDE panel)
STEP 2:
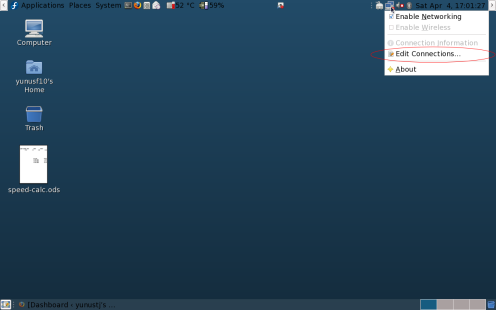
Right click on NetworkManager applet and Select “Edit Connections …” (causing “Network Connections” window will appear)
STEP 3:
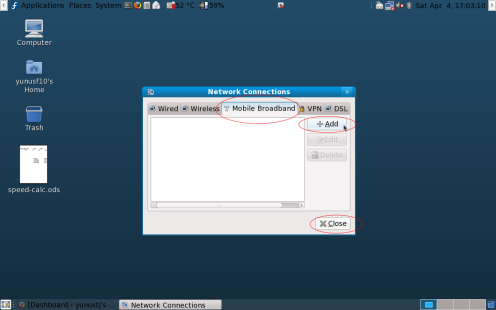
Left Click “Mobile Broadband” tab and press “Add button”.
This will trigger “Choose a Mobile Broadband Connection” window appear
STEP 4:
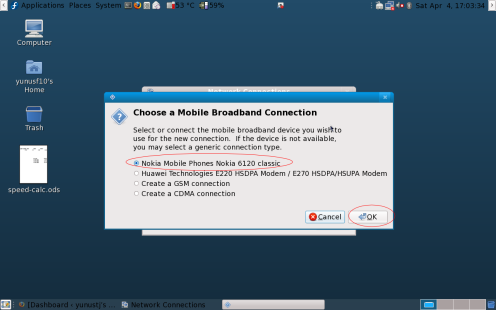
Select “Nokia Mobile Phones Nokia 6120 classic” device and press “OK” button
STEP 5:
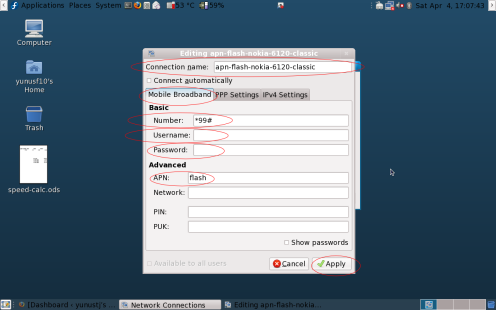
“Editing GSM connection 1″ dialogue window will pop up.
Edit the “Connection name” by giving informative connection name and fill in text boxes for:
Number = *99#
Username = <blank>
Password = <blank>
APN = flash
Network = <blank>
PIN = <blank>
PUK =<blank>
and then click “Apply” button. If the APN=telkomsel, then username=wap and password =wap123
STEP 6 :
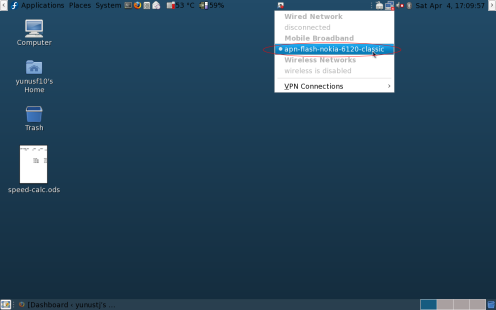
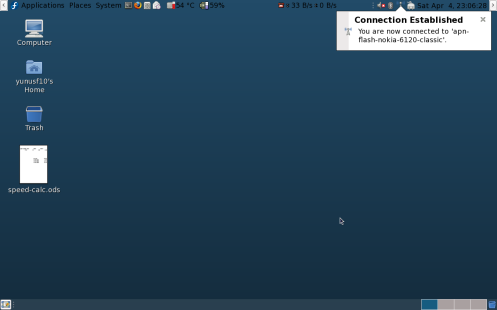
To make internet connection, left click on NetworkManager applet and select the connection name we have just created.
STEP 7 :
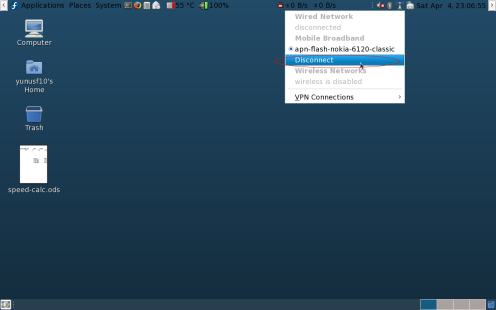
To disconnect the internet connection, left click the NetworkManager applet and select “Disconnect”

Internet Connection Using wvdial Via Bluetooth
u must have linux ??
yes, it is a fedora linux
ah man :(
there’s no way 4 win xp to connect 6120 :@
i got bad luck
my other phone 6630 i use mrouter + gnubox it show
connection open but when i try to surf the net he coneect via
Bt but dont load the page :(
On win xp I just install the PC Suite that comes with 6120. It works.
What version of the linux distro did you use?
You might need to add DNS server to /etc/resolv.conf
u mean i can connect 6120 classic at win xp ??
hello i cnt edit anything in ‘wvdial.conf’ file..
It says permission denied….
Reply soon…
much batter,,thanks
Hey I know this is off topic but I was wondering if you knew of any widgets
I could add to my blog that automatically tweet my newest twitter updates.
I’ve been looking for a plug-in like this for quite some time
and was hoping maybe you would have some experience with something like this.
Please let me know if you run into anything. I truly enjoy reading your blog and I look forward
to your new updates.
Excellent web site you have here.. It’s hard to find high quality writing like yours these
days. I seriously appreciate people like you! Take care!!
mo Adil azmi email come